Closed-loop system

This guide provides step-by-step instructions on how to create a mechanical closed-loop system using the API and the PMP simulator. During this guide you will learn how to:

  • Create a position controller using a predefined template provided by PMP.

  • Create a second-order mechanical plant using a predefined template provided by PMP.

  • Interconnect all components to establish a closed-loop system.

  • Configure control parameters and limits.

  • Use a configuration XML file to upload pre-configured settings.

  • Use an axis command sequence to perform a relative move.

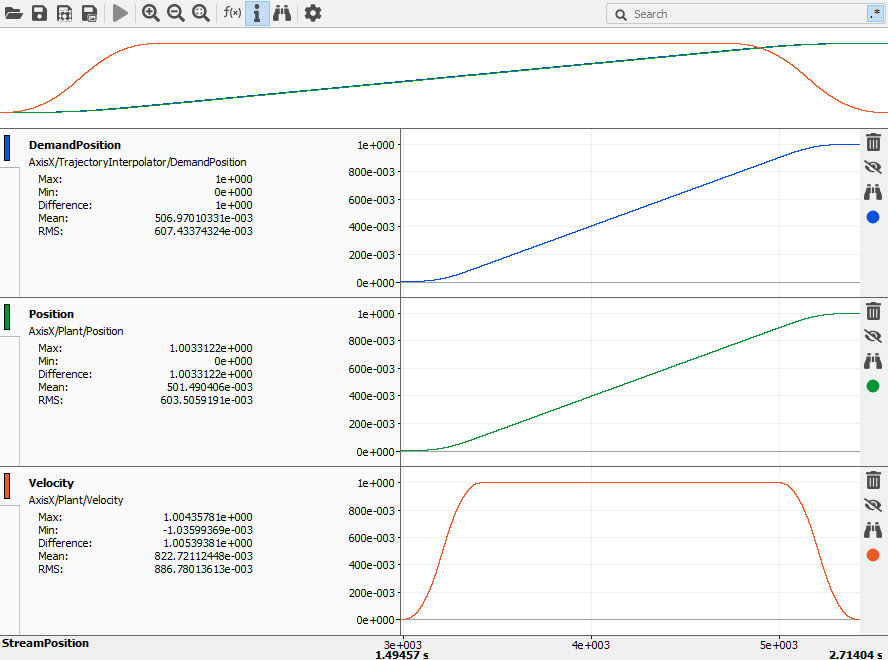
  • Configure a scope and trace the behavior of the simulated plant.

Introduction

In a mechanical closed-loop system, a feedback tracking device is used to transmit the output signal of a plant to a controller to account for expected errors. The controller evaluates the error between the setpoint command and the actual feedback of the plant and adjusts the system behavior accordingly. A typical mechanical closed-loop system can be described as follows:

Closed-loop system

Closed-loop system

In this guide a simulated mechanical plant model is used. Since we are using a simulated system, all of the required components can be created and controlled under a logical axis control provided by the Arcas 5EG top-controller.

Simulated closed loop system

Simulated closed-loop system

  • Top controller - A top-level motion controller.

  • Axis control - A container for all functionality required to control an axis.

  • Setpoint - Position reference value, which is commanded by the user and calculated by the axis control trajectory interpolator.

  • Position controller - A position feedback controller, which automatically adjusts and reacts to the calculated error between the setpoint and the mechanical plant output.

  • Mechanical plant - Representation of the mechanical system, which includes an actuator and sensor model.

Note

All of the above components can be created using the API. However, in this guide a configuration XML file is used to configure the different components (except the top-controller, which is configured using a controller description XML file). This reduces API calls, allows quicker initialization of the system and quicker configuration of multiple top-controllers.

Prerequisites

Before continuing with the quick-start guide, please make sure that the following prerequisites are met:

  • PMP should be installed with Simulator and Tooling features. Follow the Installation quick-start guide if this is not yet the case.

    A Typical installation includes the required Simulator and Tooling features.
  • The closed-loop system quick start project files should be available. These files can be downloaded from Downloads.

    • System description file:
      A system description file system.xml, which describes the system properties and includes the controllers’ description.
    • Controller description file:
      A top-controller (Arcas) controller_arcas_5eg.xml, which describes the controller’s main properties, such as templates, number of axes, processing blocks, updatables, and more.
      A sub-controller (Arcas FPGA) controller_arcas_5eg_slave, which includes digital IOs.
    • Configuration file:
      A configuration file configuration.xml, which is used to configure a controller.
    • Position controller processing block binary:
      A simple position controller processing block binary PositionControlSimple-windows-x86_64.bin, which is used to control the position set-points.
    • Mechanical plant processing block binary:
      A second order mechanical plant processing block binary PlantSecondOrderMechanical-windows-x86_64.bin, which is used to simulate a mechanical plant.

Procedure

The guide will go through the followings steps to establish a closed-loop system:

  1. Initialize system and discover top-controller.

  2. Create components:

    • Axis control - Create an axis control from an predefined template.

    • Position controller - Create a position controller using a predefined template binary provided by PMP.

    • Mechanical plant - Create a second-order mechanical plant using a predefined template binary provided by PMP.

  3. Component interconnections - Connecting signals to inputs.

  4. Parameter configuration - Configure control parameters and limits.

  5. Perform motion simulation - Command a relative move and trace the results using a scope.

Initialize system and discover top-controller

First, it is required to establish a connection with a top-controller. In this guide, the simulated system of the Create a simulator quick-start guide is used. If not already the case follow the Create a simulator quick-start guide to the point where the Arcas 5EG-1 is first started and in Config state.

Note

It is also possible to follow this quick-start guide on a physical Arcas 5EG controller. As an additional prerequisite make sure the processing block binaries for the physical controller are available, i.e. PositionControlSimple-bb-armv8a_64.bin and PlantSecondOrderMechanical-bb-armv8a_64.bin

Create components

Axis control

Instantiate an axis control AxisX using the builtin LogicalAxisControlStandard3rdOrderTemplate template.

1
2
3
4
<Controller Name="Arcas 5EG-1">
    <AxisControl Name="AxisX" Template="LogicalAxisControlStandard3rdOrderTemplate">
    </AxisControl>
</Controller>

Position control processing block

Instantiate a position control processing block PositionControl using the provided PositionControlSimple-windows-x86_64.bin.

 1
 2
 3
 4
 5
 6
 7
 8
 9
10
11
<Controller Name="Arcas 5EG-1">
    <Template Name="PositionControlTemplate" TemplateType="ProcessingBlock">
        <Updatable Name="Updatable">
            <FilePath RelativeTo="File">PositionControlSimple-windows-x86_64.bin</FilePath>
        </Updatable>
    </Template>
    <AxisControl Name="AxisX" Template="LogicalAxisControlStandard3rdOrderTemplate">
        <ProcessingBlock Name="PositionControl" Template="PositionControlTemplate">
        </ProcessingBlock>
    </AxisControl>
</Controller>

Mechanical plant processing block

Instantiate a mechanical plant processing block Plant using the provided PlantSecondOrderMechanical-windows-x86_64.bin.

 1
 2
 3
 4
 5
 6
 7
 8
 9
10
11
<Controller Name="Arcas 5EG-1">
    <Template Name="PlantSecondOrderMechanicalTemplate" TemplateType="ProcessingBlock">
        <Updatable Name="Updatable">
            <FilePath RelativeTo="File">PlantSecondOrderMechanical-windows-x86_64.bin</FilePath>
        </Updatable>
    </Template>
    <AxisControl Name="AxisX" Template="LogicalAxisControlStandard3rdOrderTemplate">
        <ProcessingBlock Name="Plant" Template="PlantSecondOrderMechanicalTemplate" CalculationStart="True">
        </ProcessingBlock>
    </AxisControl>
</Controller>

Component interconnections

So far, we defined a configuration XML file to instantiate an axis control, a mechanical plant, and a position control processing block. To create a closed-loop system, it is required to establish connections between the different axis control functionalities. The connections define the information exchange between the components. Based on the connections PMP can determine the order in which the components need to be calculated.

Component interconnections shows the required connections to form a minimal closed-loop system. To establish a connection, each signal indicated with a dashed-lines needs to be connected to it’s corresponding input indicated with a dashed-squares.

Component interconnections

Component interconnections

Position control & mechanical plant interconnections

Create the connections between PositionControl and Plant.

 1
 2
 3
 4
 5
 6
 7
 8
 9
10
11
12
13
14
15
16
17
18
19
20
21
<Controller Name="Arcas 5EG-1">
    <Template Name="PositionControlTemplate" TemplateType="ProcessingBlock">
        <Updatable Name="Updatable">
            <FilePath RelativeTo="File">PositionControlSimple-windows-x86_64.bin</FilePath>
        </Updatable>
    </Template>
    <Template Name="PlantSecondOrderMechanicalTemplate" TemplateType="ProcessingBlock">
        <Updatable Name="Updatable">
            <FilePath RelativeTo="File">PlantSecondOrderMechanical-windows-x86_64.bin</FilePath>
        </Updatable>
    </Template>
    <AxisControl Name="AxisX" Template="LogicalAxisControlStandard3rdOrderTemplate">
        <ProcessingBlock Name="Plant" Template="PlantSecondOrderMechanicalTemplate" CalculationStart="True">
            <Input Name="Actuator" Source="AxisX/PositionControl/ControlOutput"/>
            <Input Name="SamplePeriod" Source="SamplePeriod"/>
        </ProcessingBlock>
        <ProcessingBlock Name="PositionControl" Template="PositionControlTemplate">
            <Input Name="PositionSensor" Source="AxisX/Plant/Position"/>
        </ProcessingBlock>
    </AxisControl>
</Controller>

Calculation start

In Component interconnections it can be seen that a signal of PositionControl is connected to an input of Plant and a signal of Plant is connected to an input of PositionControl. These connections create a circular dependency. To indicate to PMP which processing block needs to be calculated first the CalculationStart attribute of the Plant processing block needs to be set to True.

1
2
3
4
5
6
<Controller Name="Arcas 5EG-1">
    <AxisControl Name="AxisX" Template="LogicalAxisControlStandard3rdOrderTemplate">
        <ProcessingBlock Name="Plant" Template="PlantSecondOrderMechanicalTemplate" CalculationStart="True">
        </ProcessingBlock>
    </AxisControl>
</Controller>

Position control & trajectory interpolator interconnections

Create the connections between PositionControl and TrajectoryInterpolator.

 1
 2
 3
 4
 5
 6
 7
 8
 9
10
11
12
13
14
15
<Controller Name="Arcas 5EG-1">
    <Template Name="PositionControlTemplate" TemplateType="ProcessingBlock">
        <Updatable Name="Updatable">
            <FilePath RelativeTo="File">PositionControlSimple-windows-x86_64.bin</FilePath>
        </Updatable>
    </Template>
    <AxisControl Name="AxisX" Template="LogicalAxisControlStandard3rdOrderTemplate">
        <TrajectoryInterpolator>
            <Input Name="DemandPositionOffset" Source="AxisX/PositionControl/DemandPositionOffset"/>
        </TrajectoryInterpolator>
        <ProcessingBlock Name="PositionControl" Template="PositionControlTemplate">
            <Input Name="DemandPosition" Source="AxisX/TrajectoryInterpolator/DemandPosition"/>
        </ProcessingBlock>
    </AxisControl>
</Controller>

Position control & command queue interconnections

Create the connections between PositionControl and CommandQueue.

 1
 2
 3
 4
 5
 6
 7
 8
 9
10
11
12
13
14
15
<Controller Name="Arcas 5EG-1">
    <Template Name="PositionControlTemplate" TemplateType="ProcessingBlock">
        <Updatable Name="Updatable">
            <FilePath RelativeTo="File">PositionControlSimple-windows-x86_64.bin</FilePath>
        </Updatable>
    </Template>
    <AxisControl Name="AxisX" Template="LogicalAxisControlStandard3rdOrderTemplate">
        <CommandQueue>
            <Input Name="IsClosedLoop" Source="AxisX/PositionControl/IsClosedLoop"/>
        </CommandQueue>
        <ProcessingBlock Name="PositionControl" Template="PositionControlTemplate">
            <Input Name="CloseLoopRequest" Source="AxisX/CommandQueue/CloseLoopRequest"/>
        </ProcessingBlock>
    </AxisControl>
</Controller>

Parameter configuration

The control parameters of the TrajectoryGenerator, PositionControl and Plant need to be configured to perform (simulated) closed loop motion. For this guide the position controller is configured as a PD controller and the plant as a mass with viscous friction.

 1
 2
 3
 4
 5
 6
 7
 8
 9
10
11
12
13
14
15
16
17
18
19
20
21
22
23
24
25
26
27
28
29
30
31
32
33
34
35
36
37
38
39
40
41
42
43
44
45
46
47
48
49
50
<Controller Name="Arcas 5EG-1">
    <Template Name="PositionControlTemplate" TemplateType="ProcessingBlock">
        <Updatable Name="Updatable">
            <FilePath RelativeTo="File">PositionControlSimple-windows-x86_64.bin</FilePath>
        </Updatable>
    </Template>

    <Template Name="PlantSecondOrderMechanicalTemplate" TemplateType="ProcessingBlock">
        <Updatable Name="Updatable">
            <FilePath RelativeTo="File">PlantSecondOrderMechanical-windows-x86_64.bin</FilePath>
        </Updatable>
    </Template>

    <AxisControl Name="AxisX" Template="LogicalAxisControlStandard3rdOrderTemplate">
        <ProcessingBlock Name="Plant" Template="PlantSecondOrderMechanicalTemplate" CalculationStart="True">
            <Input Name="Actuator" Source="AxisX/PositionControl/ControlOutput"/>
            <Input Name="SamplePeriod" Source="SamplePeriod"/>
            <Signal Name="Mass" Unit="kg">10</Signal>
            <Signal Name="Damping" Unit="Ns/m">1</Signal>
            <Signal Name="Stiffness" Unit="N/m">0</Signal>
        </ProcessingBlock>

        <TrajectoryGenerator>
            <Signal Name="MaximumVelocity" Unit="m/s">1</Signal>
            <Signal Name="MaximumAcceleration" Unit="m/s^2">10</Signal>
            <Signal Name="MaximumJerk" Unit="m/s^3">100</Signal>
        </TrajectoryGenerator>

        <TrajectoryInterpolator>
            <Input Name="DemandPositionOffset" Source="AxisX/PositionControl/DemandPositionOffset"/>
        </TrajectoryInterpolator>

        <CommandQueue>
            <Input Name="IsClosedLoop" Source="AxisX/PositionControl/IsClosedLoop"/>
        </CommandQueue>

        <ProcessingBlock Name="PositionControl" Template="PositionControlTemplate">
            <Input Name="CloseLoopRequest" Source="AxisX/CommandQueue/CloseLoopRequest"/>
            <Input Name="DemandPosition" Source="AxisX/TrajectoryInterpolator/DemandPosition"/>
            <Input Name="PositionSensor" Source="AxisX/Plant/Position"/>
            <Filter Name="PID_LowPass">
                <Signal Name="ProportionalGain">700</Signal>
                <Signal Name="IntegratorFrequency">0</Signal>
                <Signal Name="LowPassFrequency">1000</Signal>
                <Signal Name="LowPassDamping">0.707</Signal>
                <Signal Name="DifferentiatorFrequency">0.1</Signal>
            </Filter>
        </ProcessingBlock>
    </AxisControl>
</Controller>

Upload configuration XML file

So far we have learned how to create and instantiate templates, interconnect the components and configure signals values using a configuration XML file. The following code can be used to apply the configuration XML on the controller:

1
2
var configurationFile = "C:\\your\\path\\to\\closed-loop-system\\configuration-files\\configuration.xml";
topController.LoadConfigurationFromFile(configurationFile);
1
2
auto configurationFile = "C:\\your\\path\\to\\closed-loop-system\\configuration-files\\configuration.xml";
topController->LoadConfigurationFromFile(configurationFile);
1
2
3
4
configurationFile = (
    "C:\\your\\path\\to\\closed-loop-system\\configuration-files\\configuration.xml"
)
topController.LoadConfigurationFromFile(configurationFile)
1
2
configurationFile = 'C:\\your\\path\\to\\closed-loop-system\\configuration-files\\configuration.xml';
topController.LoadConfigurationFromFile(configurationFile);

Motion simulation

Now that our closed-loop system is fully defined, we can do movement with the simulated system.

Enable top-controller and axis control

First move the Arcas 5EG-1 top-controller to the Run state and wait until the state is reached.

1
2
topController.Run();
topController.WaitState(Pmp.TopControllerState.Run, 10.0);
1
2
topController->Run();
topController->WaitState(Pmp::ETopControllerState::Run, 10.0);
1
2
topController.Run()
topController.WaitState(Pmp.TopControllerState.Run, 10.0)
1
2
topController.Run();
topController.WaitState(Pmp.TopControllerState.Run, 10.0);

Retrieve references to AxisX and it’s CommandQueue and clear any existing faults.

1
2
3
4
5
var axis = topController.AxisControls["AxisX"];
axis.ResetFault();

var commandQueue = axis.CommandQueue;
commandQueue.Clear();
1
2
3
4
5
auto axis = topController->GetAxisControls()["AxisX"];
axis->ResetFault();

auto commandQueue = axis->GetCommandQueue();
commandQueue->Clear();
1
2
3
4
5
axis = topController.AxisControls["AxisX"]
axis.ResetFault()

commandQueue = axis.CommandQueue
commandQueue.Clear()
1
2
3
4
5
axis = topController.AxisControls.Item('AxisX');
axis.ResetFault();

commandQueue = axis.CommandQueue;
commandQueue.Clear();

Use a Command sequence to traverse the Axis control state machine and enable AxisX for closed-loop motion.

1
2
3
4
5
6
7
8
9
var enableSeq = commandQueue.CreateCommandSequence(new List<Pmp.CommandType> {
    Pmp.CommandType.Shutdown,
    Pmp.CommandType.SwitchOn,
    Pmp.CommandType.EnableOperation,
    Pmp.CommandType.CloseLoop
});

commandQueue.Queue(enableSeq);
enableSeq.WaitComplete(10.0);
1
2
3
4
5
6
7
8
9
auto enableSeq = commandQueue->CreateCommandSequence(std::vector<Pmp::ECommandType>{
    Pmp::ECommandType::Shutdown,
    Pmp::ECommandType::SwitchOn,
    Pmp::ECommandType::EnableOperation,
    Pmp::ECommandType::CloseLoop
});

commandQueue->Queue(enableSeq);
enableSeq->WaitComplete(10.0);
 1
 2
 3
 4
 5
 6
 7
 8
 9
10
11
12
13
14
15
commandType = [
    Pmp.CommandType.Shutdown,
    Pmp.CommandType.SwitchOn,
    Pmp.CommandType.EnableOperation,
    Pmp.CommandType.CloseLoop,
]

commandList = List[Pmp.CommandType]()
for type in commandType:
    commandList.Add(type)

enableSeq = commandQueue.CreateCommandSequence(commandList)

commandQueue.Queue(enableSeq)
enableSeq.WaitComplete(10.0)
1
2
3
4
5
6
7
8
9
enableSeq = commandQueue.CreateCommandSequence(CreateList('Pmp.CommandType',({
    Pmp.CommandType.Shutdown, ...
    Pmp.CommandType.SwitchOn, ...
    Pmp.CommandType.EnableOperation, ...
    Pmp.CommandType.CloseLoop ...
    })));

commandQueue.Queue(enableSeq);
enableSeq.WaitComplete(10.0);

Command a move and configure acquisition

Create a move sequence with a relative move and a distance of \(1\):

1
2
3
4
5
6
7
8
var moveSeq = commandQueue.CreateCommandSequence(Pmp.CommandType.RelMove);

// Configure relative move sequence
var endPosition = 1.0;
var endVelocity = 0.0;
var move = (Pmp.IRelMove)moveSeq.Commands.First();
move.CompletionCriterion = Pmp.CompletionCriterion.TrajectoryComplete;
move.Configuration = Tuple.Create(endPosition, endVelocity);
1
2
3
4
5
6
7
8
auto moveSeq = commandQueue->CreateCommandSequence(Pmp::ECommandType::RelMove);

// Configure relative move sequence
auto endPosition = 1.0;
auto endVelocity = 0.0;
auto move = std::dynamic_pointer_cast<Pmp::IRelMove>(moveSeq->GetCommands().front());;
move->SetCompletionCriterion(Pmp::ECommandCompletionCriterion::TrajectoryComplete);
move->SetConfiguration(std::make_tuple(endPosition, endVelocity));
1
2
3
4
5
6
7
8
9
moveSeq = commandQueue.CreateCommandSequence(Pmp.CommandType.RelMove)

# Configure relative move sequence
endPosition = 1.0
endVelocity = 0.0
commands = list(moveSeq.Commands)
move = Pmp.IRelMove(commands[0])
move.CompletionCriterion = Pmp.CompletionCriterion.TrajectoryComplete
move.Configuration = Tuple[Double, Double](endPosition, endVelocity)
 1
 2
 3
 4
 5
 6
 7
 8
 9
10
moveSeq = commandQueue.CreateCommandSequence(Pmp.CommandType.RelMove);

% Configure relative move sequence
endPosition = 1.0;
endVelocity = 0.0;

commands = ToCell(moveSeq.Commands);
move = commands{1};
move.CompletionCriterion = Pmp.CompletionCriterion.TrajectoryComplete;
move.Configuration = CreateTuple('System.Double', 'System.Double', endPosition, endVelocity);

Note

Motion profiles are defined by two sets of parameters:

  • Move constraints, such as maximum acceleration and velocity, are configured in the configuration.xml file.

  • Move end-conditions, such as distance for a relative move, are provided in the move command.

Create a list of signals to acquire and pass them to the acquisition function ConfigureSignals as follows:

1
2
3
4
5
var signalPaths = new List<string> {
    "AxisX/TrajectoryInterpolator/DemandPosition",
    "AxisX/Plant/Position",
    "AxisX/Plant/Velocity",
};
1
2
3
4
5
auto signalPaths = std::vector<std::string>{
    "AxisX/TrajectoryInterpolator/DemandPosition",
    "AxisX/Plant/Position",
    "AxisX/Plant/Velocity",
};
1
2
3
4
5
signalPaths = [
    "AxisX/TrajectoryInterpolator/DemandPosition",
    "AxisX/Plant/Position",
    "AxisX/Plant/Velocity",
]
1
2
3
4
5
signalPaths = ({
    'AxisX/TrajectoryInterpolator/DemandPosition', ...
    'AxisX/Plant/Position', ...
    'AxisX/Plant/Velocity', ...
});

A wrapper class Acquisition is used to configure all acquisition settings.

1
var acquisition = new Acquisition(topController);
1
auto acquisition = Acquisition(topController);
1
acquisition = Acquisition(topController)
1
acquisition = Acquisition(topController);

Where the Acquisition constructor is described as follows:

1
2
3
4
5
6
public Acquisition(ITopController _topController)
{
    topController = _topController;
    acquisition = topController.ReserveAcquisition();
    acqSink = null;
}
1
2
3
4
5
6
Acquisition(Pmp::PTopController _topController)
{
    topController = _topController;
    acquisition = topController->ReserveAcquisition();
    acqSink = nullptr;
}
1
2
3
4
5
def __init__(self, topController):

    self.topController = topController
    self.acquisition = topController.ReserveAcquisition()
    self.acqSink = None
1
2
3
4
5
function obj = Acquisition(topController)
    obj.topController = topController;
    obj.acquisition = topController.ReserveAcquisition();
    obj.acqSink = [];
end

Pass the previously created list of signals through the acquisition function ConfigureSignals as follows:

1
acquisition.ConfigureSignals(signalPaths);
1
acquisition.ConfigureSignals(signalPaths);
1
acquisition.configure_signals(signalPaths)
1
acquisition.configureSignals(signalPaths);

Where the acquisition.ConfigureSignals function is described as follows:

1
2
3
4
5
6
7
public void ConfigureSignals(List<string> signalPaths)
{
    foreach (var path in signalPaths)
    {
        acquisition.Signals.Add(topController.GetByPath<ISignal>(path));
    }
}
1
2
3
4
5
6
7
void Acquisition::ConfigureSignals(std::vector<std::string> signalPaths)
{
    for (auto path : signalPaths)
    {
        acquisition->AddSignal(topController->GetByPath<Pmp::PSignal>(path));
    }
}
1
2
3
4
5
6
7
def configure_signals(self, signalPaths):

    for path in signalPaths:
        self.acquisition.Signals.Add(
            self.topController.GetByPath[Pmp.ISignal](path)
        )

1
2
3
4
5
6
function configureSignals(obj, signalPaths)
    for path = 1:length(signalPaths)
        signal = NET.invokeGenericMethod(obj.topController, 'GetByPath',{'Pmp.ISignal'}, string(signalPaths(1,path)));
        obj.acquisition.Signals.Add(signal);
    end
end

Move the axis with acquisition enabled:

1
2
3
4
acquisition.Start();
commandQueue.Queue(moveSeq);
moveSeq.WaitComplete(10.0);
acquisition.Stop();
1
2
3
4
acquisition.Start();
commandQueue->Queue(moveSeq);
moveSeq->WaitComplete(10.0);
acquisition.Stop();
1
2
3
4
acquisition.start()
commandQueue.Queue(moveSeq)
moveSeq.WaitComplete(10.0)
acquisition.stop()
1
2
3
4
acquisition.start();
commandQueue.Queue(moveSeq);
moveSeq.WaitComplete(10.0);
acquisition.stop();

Where the acquisition.Start function is described as follows:

1
2
3
4
5
public void Start()
{
    acqSink = acquisition.ReserveAcqSink(-1, AcqSinkMode.DiscardOldSamples);
    acquisition.Start();
}
1
2
3
4
5
void Acquisition::Start()
{
    acqSink = acquisition->ReserveAcqSink(-1, Pmp::EAcqSinkMode::DiscardOldSamples);
    acquisition->Start();
}
1
2
3
4
5
6
def start(self):

    self.acqSink = self.acquisition.ReserveAcqSink(
        -1, Pmp.AcqSinkMode.DiscardOldSamples
    )
    self.acquisition.Start()
1
2
3
4
function start(obj)
    obj.acqSink = obj.acquisition.ReserveAcqSink(-1, Pmp.AcqSinkMode.DiscardOldSamples);
    obj.acquisition.Start();
end

And the acquisition.Stop function is described as follows:

1
2
3
4
5
public void Stop()
{
    acquisition.Stop();
    acqSink?.WaitComplete(10.0);
}
1
2
3
4
5
void Acquisition::Stop()
{
    acquisition->Stop();
    acqSink->WaitComplete(10.0);
}
1
2
3
4
def stop(self):

    self.acquisition.Stop()
    self.acqSink.WaitComplete(10.0)
1
2
3
4
function stop(obj)
    obj.acquisition.Stop();
    obj.acqSink.WaitComplete(10.0);
end

Save acquisition trace to file for analysis:

1
2
var traceFile = "closed-loop-system-relmove.msf";
acquisition.WriteToFile(traceFile);
1
2
auto traceFile = "closed-loop-system-relmove.msf";
acquisition.WriteToFile(traceFile);
1
2
traceFile = "closed-loop-system-relmove.msf"
acquisition.write_to_file(traceFile)
1
2
traceFile = 'closed-loop-system-relmove.msf';
acquisition.writeToFile(traceFile);

Where the acquisition.WriteToFile function is described as follows:

1
2
3
4
public void WriteToFile(string fileName)
{
    acqSink?.WriteToFile(AcqFileFormat.Msf, fileName);
}
1
2
3
4
5
6
void Acquisition::WriteToFile(std::string fileName)
{
    if(acqSink != nullptr)
    {
        acqSink->WriteToFile(Pmp::EAcqFileFormat::Msf, fileName);
    }
1
2
3
4
def write_to_file(self, fileName):

    if self.acqSink != None:
        self.acqSink.WriteToFile(Pmp.AcqFileFormat.Msf, fileName)
1
2
3
4
function writeToFile(obj, fileName)
    if not(isempty(obj.acqSink))
        obj.acqSink.WriteToFile(Pmp.AcqFileFormat.Msf, fileName);
    end

The acquisition closed-loop-system-relmove.msf file can be found in the project folder and opened in the PMP Tooling. The relative move sequence should look as follows:

Simulated closed loop move sequence

Simulated closed loop move sequence

Disable axis control

First, the axis control needs to be disabled:

1
2
3
4
5
6
7
var disableSeq = commandQueue.CreateCommandSequence(new List<Pmp.CommandType> {
    Pmp.CommandType.DisableOperation,
    Pmp.CommandType.Shutdown,
    Pmp.CommandType.DisableVoltage,
});
commandQueue.Queue(disableSeq);
disableSeq.WaitComplete(10.0);
1
2
3
4
5
6
7
auto disableSeq = commandQueue->CreateCommandSequence(std::vector<Pmp::ECommandType>{
    Pmp::ECommandType::DisableOperation,
    Pmp::ECommandType::Shutdown,
    Pmp::ECommandType::DisableVoltage,
});
commandQueue->Queue(disableSeq);
disableSeq->WaitComplete(10.0);
 1
 2
 3
 4
 5
 6
 7
 8
 9
10
11
12
13
14
disableSeq = [
    Pmp.CommandType.DisableOperation,
    Pmp.CommandType.Shutdown,
    Pmp.CommandType.DisableVoltage,
]

commandList = List[Pmp.CommandType]()
for type in disableSeq:
    commandList.Add(type)

disableSeq = commandQueue.CreateCommandSequence(commandList)

commandQueue.Queue(disableSeq)
disableSeq.WaitComplete(10.0)
1
2
3
4
5
6
7
8
disableSeq = commandQueue.CreateCommandSequence(CreateList('Pmp.CommandType',({
    Pmp.CommandType.DisableOperation, ...
    Pmp.CommandType.Shutdown, ...
    Pmp.CommandType.DisableVoltage, ...
    })));

commandQueue.Queue(disableSeq);
disableSeq.WaitComplete(10.0);

To stop the top-controller, change the state to Config:

1
2
topController.Stop();
topController.WaitState(Pmp.TopControllerState.Config, 10.0);
1
2
topController->Stop();
topController->WaitState(Pmp::ETopControllerState::Config, 10.0);
1
2
topController.Stop()
topController.WaitState(Pmp.TopControllerState.Config, 10.0)
1
2
topController.Stop();
topController.WaitState(Pmp.TopControllerState.Config, 10.0);

Clean-up simulator

In case no additional usage of the controller is required, the simulation can be cleaned up. To dispose/destroy the simulator, the following code can be used:

1
topController?.Dispose();
1
2
3
4
   if(topController != nullptr)
   {
       topController->Destroy();
   }
1
2
if topController != None:
    topController.Dispose()
1
2
3
if not(isempty(topController))
    topController.Dispose();
end